Have 10mm will travel · 14 November 05

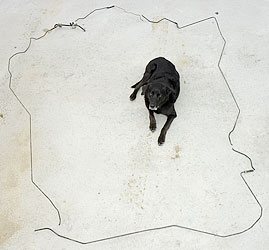
This image depicts:
A) The very latest in dog fence technology
B) A dog thinking inside the box
C) The last of Eve’s fuel line, removed and then stretched out on the ground with a standard ZMU for reference.
D) All of the above
BZZZZZZZTTTTT!!!!
Time is up. Put down your pencils and pass your tests forward please.
The answer is, of course, D) All of the Above.
Back when we were kids growing up in Nebraska we had two choices for making forts: in a tree or undeground. Since the big kids down the blocked lived next to the only tree that pretty much left us digging holes.
Unlike the soil here in New Hampshire you can actually dig for days in Nebraska without ever hitting a stone larger than slingshot size. The only real problem is hitting sand and water, which usually happens below six feet. We’d dig a big hole in the ground, cover it up with boards and dirt, and then dig a narrow tunnel into it for secret access.
Instant fort!
I only mention this because it came to mind while I was zipping back and forth under the car with the chassis flying a few inches by my nose. Felt a lot like squirming through those claustrophobic tunnels in Nebraska.
10mm socket in hand I removed all of the brake and fuel line clamps, pried out the three fuel line tubes, and then bolted the two brake lines back into place. Cramp, tight, and dirty work with a few surprise splashes of gasoline still left in the pipes.
I think it’s now safe to say that Eve is truly gas-free.

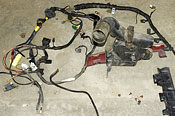
Here’s some of the other relics pulled out of the car recently. Another bunch of wire came out, mostly the fuel injection bundle from inside and the cables to the alternator.
The flat plastic things are some sort of “scoop” to help channel air flow from below the bumper up towards the two radiators.
Gone.
The esophagus looking thing in the center was the most interesting removal. When I started getting serious about chasing all of the wires I found that there’s a big bundle that goes from the passenger compartment, through the left front fender, and then back into the engine compartment by the battery.
In order to get to it, the wheel well plastic was pulled off, another horn removed (one in each fender), and then this plastic contraption. It’s the air intake for the engine. They kind of jammed into the front of the fender (less dirt?) with a hose running down into a plastic container. I figure the container is meant to catch water.
That or it’s a precisely tuned harmonic chamber meant to reverberate when you step on the gas and give the car a deep, powerful sound.
Naw… ”:^)

With that out of the way I set about my mad task of reverse engineering the wiring.
First off there’s lots of electrical tape and most of it is pretty grimy with engine grease. If nothing else I’ll at least be cleaning that up. Secondly, who the heck did all of this wrapping? It certainly doesn’t look like a machine was able to do it. Having wrapped my fair share of wire with electrical tape over the years I must say that this is impressive.
There’s a couple types of wrapping going on here. First they wrap the base wire bundles, with more tape around junctions or offshoots of wires. Then there’s the plastic sheathing which covers some of the wiring and is taped in place. This is probably for the hotter parts of the car or places where the wire might be rubbed, since I found some of it melted a bit and some abrasion.
Finally there’s the tape that holds the plastic channels and connectors. These usually snap into the body frame to hold the bundle in place, especially when going around a corner.

This “sign” was made out of the removed electrical tape and measures about 7 foot by 6 foot. The biggest continuous piece of electrical tape was almost seven feet long.
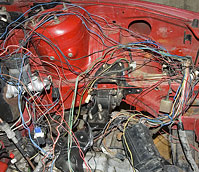
I haven’t unwound enough of the bundles to really claim any victories yet. The jumble shown earlier is the result of unravelling the bundle going to the relays on the firewall. I thought this would be an easy win since four out of five of the relays are fuel injection (EFI) related, the fifth one is the horn. The brake fluid sensor connector is in the same bundle.
Lots of common grounds and pretty messy. Looks like the EFI lines go into the passenger compartment via the main bundle and then branch off from there.
Not all of the time was spent messing with wiring though. Me and my trusty 10mm found all kinds of extra things to unbolt and throw in the scrap pile.
Both sides of the firewall are looking mighty clean.


When I do my car, I’m just going to remove the stock wiring harness in it’s entirety and run new wires for the lights, etc.
How good of condition is the insulation on your stock harness and how long would it take you to sort through it vs’s just running new wires of proper gauge with fresh insulation?
Check this out just for example:
http://www.harborfreight.com/cpi/ctaf/Displayitem.taf?itemnumber=3384
Also this place sells 100’ spools for like $9:
http://store.summitracing.com/default.asp?target=egnsearch.asp&N=4294925143+4294839062+4294868815
Check this out:
http://www.jegs.com/webapp/wcs/stores/servlet/CategoryDisplay?catalogId=10002&storeId=10001&categoryId=18519
Or this for the other style:
http://www.waytekwire.com/
What I like about those is the ground. Run a large wire to the front and to the back of the car and use that for a “common ground” and ground it back at the fuse panel. That way the vehicle body is not being used for ground. Just seems safer to me since the 12 volt DC/DC gets it’s power from the 100 plus volt pack and all in case something went wrong with it. Seems like it would be a more reliable ground anyways.
Excellent idea!
Thanks for the links, Ryan. The last one to waytekwire didn’t work (their store doesn’t appear to like doling out permanent links) so I changed it to the base website.
For a fleeting moment yesterday I was thinking about starting all over. It’s certainly tempting. First, like with all things, I must make a list!
The other idea I had was to do something with a 1-wire bus. Basically, from what I’ve read, it’s a network over a single wire.
For example, you’d run three wires to the back of the car: power, ground, and a signal wire. At the back there would be a control board to decode the instructions and turn on/off lights via relays.
Overkill, I know, but kind of cool.
For Waytek’s fuse block is item # 46063 for the one with 12 connections and 46062 for the one with 10.
The Firewall may be clean, but the garage floor isn’t….
Er, uhm, what mess?
I soo want to do an EV!
I only got a $500-1000 budget per month though :\
I want to make the adapter plate myself but I wouldn’t know the first about attaching the motor to the trans via clutch or flywheel.
Mom’s always buggin’ Jer to clean up his mess.
Last year my students and finished up an EV conversion and found that the best thing to do was re-wire the system. We purchased a plastic project box and two terminal strips, one for positive, and the other negative. This system was 12 volts, so it was easy to find a master switch. By running all aux systems off a buss system, you eliminate the confusion of wiring harnesses, and tracing out future problems is a breeze.
Whatever you do, do not have an exposed ground line. The last thing you want is a leak to ground. It is not a good idea to run a ground to both the front and the back of the vehicle. You are going to want to keep everything centralized.
– Chris
Howdy Chris,
That was my fallback plan. If I screwed up the trimming I’d toss the whole works and try my hand at wiring from scratch.
Not sure I understand the ground line statement. In the Probe they screw the ground wire to the chassis a number of times in various places.
A lot times when working on an EV, you’ll get what is called a leak to ground. Beleive it or not, if the current is high enough, you can find voltage grounding to the chassis from your traction system. (That is is you are using one voltage for traction 72-144 VDC, and 12 VDC for aux system). Therefore, in an EV conversion, you need to create an isolated ground. Basically, you can’t ground to the chassis, you have create your own. That’s were re-wiring comes into play. If you don’t have an isolated ground for your system, you may end up with some nasty shocks. this gets even trickier if you are using a DC to DC converter for your 12 volt power system. In the end, I would recommend that you start from scratch. I think that you will save a lot of time in the end, and you’ll have a system that weights less, and works better than the factory installed one. Have you checked out “Build Your Own Electric Vehicle” by Bob Brant? If you haven’t, it an excellent resource to have on the shelf. – Chris
Ah, I see. On my last EV I made sure to isolate the pack circuit: it wasn’t grounded to the chassis or connected to the aux battery. I used a DC-DC adaptor to isolate the e-meter.
I have Bob’s book, along with another. Thanks for the reminder, good time to review it.
82 rabbit conversion
what type of fluid & how much should I put in the manual tranny?
I have been using Red Line SuperLight in my conversion, it isn’t a VW Golf/Rabbit though. Such light gear oil doesn’t help the shifting but I suppose it lowers the frictional losses.
I also would only use this stuff if you are putting much less power through the gearbox than standard.
You could get some standard manual transmission gear oil if you are unsure. Red Line also produce low friction racing gear oil which isn’t quite as light as the SuperLight
Refer to your handbook for amount, its probably up to the filler hole.
People should learn more about energy alternatives like electric cars. The new ones coming out are way better than gas cars. One of the main electric car companies, Zap, has delivered more than 100,000 electric vehicles (source: www.zapworld.com). EV’s cost 1 to 3 cents per mile to run, compare that to regular cars!