Gutting for Fun and Profit · 1 November 05

First off a correction. Nathan, another Probe owner, sent an email letting me know that what I thought was the ECU under the passenger seat is in fact the 20 watt stereo amp. Well, that would explain the pathetic chip count!
Turns out the ECU or ECA or whatever it is called is behind the dash, up along the firewall area with the huge bundle of fuel injection cables leading right to it. I yanked it out last night, popped open the case, and indeed it looks like an on-board computer ought to look. I’ll post a pic soon.
But I’m getting ahead of myself.
Finally got the shop manuals for the 1990 Ford Probe. Ordered it from some nice folks on Ebay and they accidentally sent 1992 manuals, so it took another week to get the right ones. Wow, what a tome! Tons of information, schematics, pics, and useless information…well, considering that over half of the car’s original mechanical parts are now gone.
I’ve been really busy at work lately and most of the EV work has been on the back burner, except for a little research. Still waffling on the batteries. I measured the space taken by the old gas tank and there’s no way Optima’s (or any full sized battery) are going to fit. It’s looking more and more like a hole in the trunk with a box-o-batteries again. So I’m procrastinating about the batteries and working on other stuff…

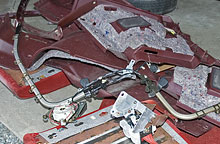
...like the passenger compartment. After getting the email about the ECU I was curious what the real on-board computer looked like. Last night I started taking things out of the passenger compartment. First to go was the carpet, but to do that I needed to remove the rear seats, and to do that I needed to remove the rear carpet. Things started pilling up quickly on the garage floor.
I think the next post will cover automotive connectors. There’s a whole bunch of different styles of screws, plastic gizmos, hooks, and other tricky things that auto manufactures use to hold a car together. I came across everything but velcro last night and can proudly say that I broke less than a third of them!
Once the carpet was out there was an ant colony to deal with and a bunch more loose change. I made a couple more bucks off of the car! Oh, and there’s a bunch of damp carpet and padding on the passenger side. The seller had mentioned a leak, which he thought might be due to a bad windshield seal. Yesterday I ran across a web site that listed poor fit and finish of doors and other parts of early Probes as causing passenger compartment leaks.
Another thing to deal with.
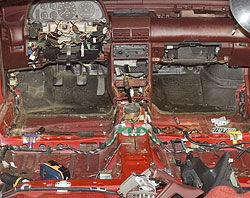
Here’s a look at the passenger compartment after most of the plastic, carpet, and panels were ripped out. Be sure to click all of the images for the “full view.” Still a whole bunch of useless wiring to get rid of as well as the factory stereo gear.

There were two other things removed last night which made a world of difference in how easy it is to get around: the stick shift and the emergency brake. A few bolts, one cable, and the whole center hump is cleaned up. The stick was removed towards the end of the night, after the photos. Really tempting to figure out a way that it isn’t needed anymore: put the tranny in second or third and leave it there!
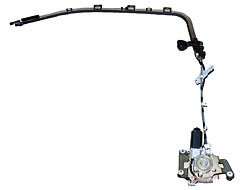
Ah, yes, and I pulled out the dreaded motorized seat belts. That’s gotta be about twenty pounds of extraneous stuff. Not sure what to use for shoulder belts now, but it’s not going to be this crazy get up. Hmm, without the stick shift and seat belt retractors the center of the car would be really clean. Since there’s no blazing hot muffler pipe running through it I wonder if it is possible to surgically remove the center hump altogether?
I’m telling you, once you start pulling a little bit of unnecessary stuff from the car it’s tempting to rip it all out and start fresh!

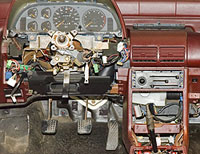
With a lot of the passenger compartment stripped out it was time to tackle the dash. If you aren’t familiar with a Ford Probe you might find it interesting to note that the steering wheel and instrument cluster are one humongous entity: when you “tilt” the wheel you are tilting the instrument block as well. I ended the night with only a little bit of the plastic facade pulled off and can see that there’s a fair bit of work to get the rest of the instrument cluster out.
The radio was held in with super-secret latches that you deactivate by sticking a special tool into the sides of the radio. Or, in my case, a whole bunch of jeweler screwdrivers. Once out I could see and remove the ECU, which was hiding behind it. The climate control faceplate was removed but I’m going to have to read the book to figure out how the control assembly is disconnected. That seems to be the lynch-pin blocking access to the rest of the dash.
The scary part my friends, even too scary for a Halloween night, is opening up the heating and air vents. Considering all of the mouse relics in the rest of the car I fully expect this to be either a full fledged incubator or a mouse burial ground. Even if the mice missed it, the 15 years of airflow surely hasn’t left behind a pleasant deposit.


Excellent!!! All excellent stuff, Jerry. I have been planning the conversion of my 1980 Triumph Spitfire for about 3 months and tonight (at about 11pm) I discovered your Mazda 626 conversion description and read every word through the Probe work so far up until your 11/1/05 section. It’s now just after 1am and I’m sure my wife has “given up on me”. I await your next stage reports just as I used to wait for the next issue of Boy’s Own Magazine” or “Popular Science”. Before I commit to buying all the EV gear for the Spit I would really like to find a way of eliminating the gearbox and clutch even if it is necessary to forego the “advancing” of the DC motor (with purported improvements in efficiency) so that I can reverse it. I’m also in a quandary vis-a-vis the sealed versus non-sealed battery choice. My other target is to maintain the same vehicle weight as original by removing the very heavy bumpers as well as the motor, gearbox and all the internal combustion engine related parts. Do you by any chance know of any Triumph Spitfire conversions besides the North Johnson High School project in NC?
Thanks for all your great documentation. Alvan Judson Fletcher NC
What a mess, the dash and all. It looks like a good place to lose some weight. I remembered you were pondering light weight racing style seats, how about an aluminum racing style dashboard. A steering column that would be easy to integrate would be a mid ‘80’s Ford Mustang or Escort. The switches are modular, the column is a simple piece and the turn signal, wiper and ignition switch wiring wouldn’t be difficult to splice to the Probe wiring. I assume you are trying to keep from stripping to much, but that Probe dash looks like, well quite a design mess. Just a thought and there would be room for a simple heater/defrost under the ‘custom’ dash !
Brother, dont try to cut out the center hump…...it gives the car alot of strength.
as far as your leak goes, check the taillight seals (against the body). the center hump is an important part of the 626/mx6/probe floor pan structure. BTW you’d make a ton of cash selling the parts you removed on performanceprobe.com . Mebbe u should go enroll as a member there. My user name is michaelknight. I have a feeling that you’ll be a big inspiration to my fellow users who are sick of the price of gas. Some of us have been considering custom Mazda turbo diesels.
I’m not sure if u knew this, but the probe has one of the lowest drag coefficients of any car out there, and according to the engineers that designed it, it only needs 6horsepower to maintain 55mph on level road surface
Thanks for the tip Rob.
I probably screwed up by offering the parts for free…nobody wants free parts! ’:^)