Car Heat · 31 January 06

I’ve pretty much wrapped up Eve’s heater work, at least the installation into the air duct part. Thankfully it wasn’t anything at all like the duct-work in the movie Brazil.
There’s still a little bit of electrical wiring to do under the hood: wire up a couple of high voltage relays, fuses, and find an enclosure to keep it all clean and dry.
Kind of has a bug-eyed look to it, eh?
Here’s what the installation looks like:

This is the view from the car’s fan section. The opening is about five inches vertically, as is the widest point horizontally. As luck would have it this is about the same size as the ceramic heater core when it is mounted on its insulated frame.
You can’t see it here, but there are two ceramic heaters, mounted back to back (well, their frames are, so about 3” apart in center). I drilled the frame mounting holes out a bit to fit some long bolts that were already laying around the shop. Almost a mistake, since the framing material is some sort of heat resistant plastic that is quite brittle.

This is the view from the other side, the side which is connected to the conjurer’s box of magic flaps and levers for redirecting airflow to the rest of the car.
I’ve change the orientation of the photo just so you don’t get overly comfortable in your spatial orientation. ”:^)
The nozzle looking thing is a drain port. Since this is the old air conditioning box it had to have a way for the moisture that gets frozen and re-thawed on the cold AC coils to escape. This would be hooked to a rubber hose that goes through the firewall towards the bottom of the car. No longer needed.
So that’s about it. But before I close out this segment on heating I wanted to share results from a little weekend experimentation.
Another of the popular “you have an EV?” follow-up questions is, “What about heat in the Winter?”
If I’m feeling bold I’ll explain all about ceramic cores, inverse resistance, on-demand instant heat, slight reduction in range, blah, blah, blah… Most of the time I simply reply that it uses an electric heater that does a pretty good job.
Which is a fine response for most folks. When faced with a curious tinkerer/engineer these kind of generalities never seem to satisfy and I’m left flailing for specifics.
So I borrowed a digital temperature probe from the office, a decent multi-meter (mine’s kind of cheap), and set out to answer the question I’m sure has been keeping all of you awake at night:
Hot or Not?
No, wait, that’s not the question, and definitely the wrong website. The real question is how well does an electric heater work?
At first I just set up the fan and heater box with the temperature probe hanging out the opening, but that’s a big opening and probably not at all representative of what we’ll read at, say, the defroster output. So I added the flap section, with flaps set on defrost mode and the temp probe hanging in one of the two output ports.
Still not perfect, but re-assembling the whole dash on the garage floor was too much, even for science.

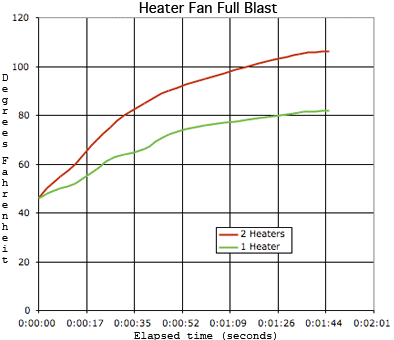
The fan was hooked to a twelve volt battery jumpered to one of the four possible speed settings: low, medium, high, BLAST. The chart above shows the results of using BLAST mode with one heater core and then two heater cores.
Actually the first couple of times I tried measuring the 2 core setup I got the same results as a single core. Turns out the extension cord was bad. Phew! Still, I was expecting blazing heat, what’s up with that?

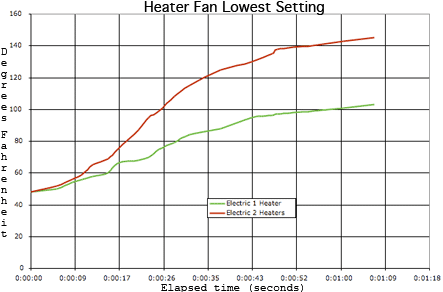
On the opposite end of the spectrum here’s what you get with the fan set on LOW. Low is pretty low speed, but it gives us a range to work with.
A ceramic heater heats up when electricity is applied. In addition to the heat rising the heater’s resistance also goes up. This makes it somewhat self-limiting, i.e. it won’t go into melt-down mode. If I had a variable speed DC fan I could have probably figured out what the maximum heat is, and even the best fan speed to optimize heat and air circulation.
BTW, I have only one data point in regard to heat rising capability. It was 46°F/7.7°C outside and that’s where all of the tests started from. How hot would they go if the temperature was twenty? Zero? If we get some colder weather I may set up the test again to find out.
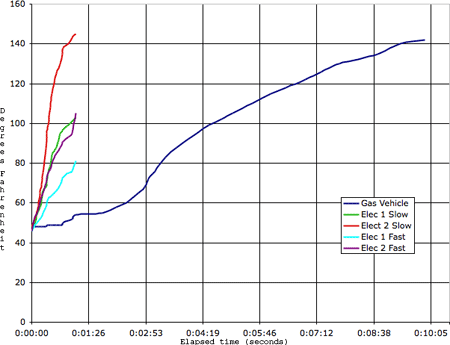
As a final test I decided to face off the electric heaters against our VW Golf’s heater.
First a little back-story on traditional car heat. When a gas engine combusts fuel about 20-25% of the fuel is turned into energy to move the car (and how efficient it is at using that depends on tire pressure, aerodynamics, weight, etc..). The other 75-80% of the energy is lost as heat: out the exhaust, the surrounding air, and into the engine core.
Think about that for a second. When we pay $2.00 a gallon for gasoline what we are really doing is paying $1.50 a gallon to heat the world. The other fifty cents worth of fuel goes towards getting us to work.
The good news is that we get “free” heat to warm our car in the winter…and in the Summer!
I should be clear that there’s no “free” heat with an EV either. On my last EV the heater pulled from 8 to 12amps (from the 144vdc pack) depending on fan speed. Compare that to the 75amps it took to drive the EV at 40mph on a flat road. The good news is that, unlike a gas engine, you can turn it off and no more energy is wasted making heat.

I only had one shot at testing this since the engine core would stay warm for a long time afterwards. I taped the temperature probe inside the car’s defrost duct, opened all of the windows (no circulation or re-heating), turned the fan up to High (not Blast) since that’s what I normally use, and turned on the car and waited.
It was pretty boring.
I’ll admit that I probably swayed the tests a little more favorably (if that is possible) towards the car. Instead of just letting it sit idling I revved up the engine a bit. Still, it was slow, with over three minutes before any kind of useable heat.
Even at the end, when it was reading 140°F/60°C, the heat gauge on the dash was showing a bit more than 180°F/82°C. I don’t know if there’s temperature limiting for the heating core or if this just showcased how inaccurate dashboard gauges can be.
All in all it was a fun experiment and I’d like to thank Faith for being my data collection assistant while I tended wires. It was a poor-man’s (woman’s?) data collector, I wrote a quickie PERL program that ran on my Powerbook. She’d read a number off the meter , typed it in, and the program time-stamped and sent it out as a comma separated value (CSV). The CSV data imports into spreadsheet programs nicely.
For those curious few, here’s the program:
    #!/usr/bin/perl
    while(<>) {
        chomp;
        my ($sec,$min,$hour,$dummy) = localtime time;
        print "$hour:$min:$sec,$_\n";
    }
I put it in a file called grab.pl and invoked it from an OS X (or Linux/Solaris) terminal window with:
perl grab.pl > output.csv
In retrospect I should have just saved the elapsed time from the first data point to all subsequent data entries, since that’s what I ended up re-calculating to make the chart.


How much do your heater cores cost? this is on my to-do list with my car.
I bought the “luxury” model (oscillating!) for about $24 each. The simpler ones cost about $18-$20 at the local *mart.
There was discussion on the EVList about using the higher voltage ceramic heaters found in England. I think it’s probably the same internal component, just wired differently.
Most temperature gauges in autos are junk. I had a palm-pilot datalogger in my last car, and the needle would be straight up in the center at any temperature between about 160 and 210. Getting 140 out of a heater core that’s 180 degrees sounds about right, the air passing through it doesn’t get a chance to heat completely up to 180.
That second graph says it all, Jerry! It’s great to have that available. I might add, too, that wiring these cores is a pain. I had one of the tabs on mine break off. This can be solved by attaching a ring terminal with a screw penetrating into the element that the tab was connected to, but that does block some air. How did you power the cores to test them? 120VAC?
Hey Dave,
I did notice the tabs are on the flimsy side.
Yep, 120vac.
Looks great—funny that we’re both working on heater stuff at the same time. I need to get some temperature measurement done on mine; I’m most concerned with what the ceramic elements’ final temperature is, without airflow, and how that changes with applied voltage. Need to figure out a worst-case value, and make sure the materials I’m using won’t degrade or fail…
I’m ordering my heater today so I’ll be a little bit behind. It’s from my EV supplier so I’ll be able to see what he uses. (Chris) The one I have seen in the shops in the UK have a thermal cut out for safety.
You may want to leave the a/c drain open in the event of an inlet cowl water leak.
Don’t use the cheap $18-$20 heaters, they are junk. I told my friend he shouldn’t have bought one, because it look of poor quality and it also had a forein inscribing, “Made in China” on it (It’s from *mart, who would of guessed?). He responds, “Yeah, but, it’s $18.”.
3 weeks later, guess what I find at his house? That same POS heater, in pieces everywhere. “Hmm, what happend?”, I said chuckling. “It broke”, he replied. “Well, why didn’t you take it back.”
He said, “I’ll give you two hints, 1: Don’t keep receipts where they can get lost. 2: Don’t loose you wallet.
Jerry,
You are the man! I can’t believe the amount of thought and work that you have put into this. And I can’t believe that I’ve sat here and read all about Eve in a single sitting. Anyway, keep up the great work and good luck!
S
Frank: good idea.
Charles: so far so good, although there are different types of $18 heaters. I think the ceramic ones are pretty robust, the “wire” heaters usually aren’t.
Scott: thanks!
Hi jerry, i read your first EV build with intrest as i too had a mazda 626. i cant believe its 10 years ago i read your first conversion :-))
anyway the other day i remembered your website and wondered if it was still around. imagine my surprise when a google for “mazda 626 electric” produced your new version as first offering…
its taken me 2 nights of solid reading but it was worth it.
had you thought of converting a kit car? there arnt too many available here in australia but in the UK and USA there seems to be quite a choice??
keep up the good work….
Hi Timothy and welcome back!
Well, I “sorta” have a kit car, it’s called Atom. But Atom’s going to need quite a few new parts before it sees the road.
The kits I’ve seen look interesting, but I’m kind of cheap and paying piles-o-money for a glorified chassis decoration seems like a waste when I can take an existing car and get it on the road without much additional expense (now that I already own all of the major EV components).
Iam currently doing an 80 pinto with a late model 5 speed from a 95 cobra r it has a low helical cut gear for additional strength as well as an .72 final overdrive ratio. I hope that it will help in the long run. I will be running a contoler of a different design by a friend who worked on ev1 and other projects having to do with on board power generation using turbine generator for additional range simaler to current hybreds
Hi Duke,
How big is your turbine generator?
Hmmm…Why not just use a small propane cylinder and a flameless heater?
Seems like the electricity used to heat the elements is really a huge waste….
Something like this…
http://www.buggiesunlimited.com/Merchant2/merchant.mvc?Screen=PROD&Product_Code=HTRUNV5039
I took my propane heater out. I Didn’t like the bottle of gas in the trunk. The 1kW or so heater I have installed will only have a small effect on range. You don’t have to use it for long.
I too, tried a ceramic heater core in my 72V powered Festiva. Unfortunately, that’s not enough volts to work well. I am trying to figure out where next to go for a little heat.
Yes mine is of marginal use on 96V It will clear the screen, but not warm the car in winter.
I guess what you need is a ceramic core rated around 72V There aren’t any midway taps on your core are there?
James:
Sorry I didn’t get back to your question. There are no midway taps on my ceramic core unfortunately. I am still looking around on the internet to see if something else comes up.
I have this exact heater installed in an 82 Rabbit, 96V conversion.
I installed a 250V/20amp fuse in-line with the contactor and it blows the fuse. Without the fuse the heater works fine.
What do I need to do now?
I think my fuse is bigger than 20A. I’ve just been outside to try my heater just now. I can get it to pull 13A. It seems to pull more current when the airflow is a bit restricted and when the fan is on low.
My particular heater core is not very powerful so it is well possible yours could be pulling over 20A. It is, after all, under 2kW at 96V. 2kW isn’t an awful lot of heat for a car.
Maybe you could measure the current, and if it needs one, fit a bigger fuse, with a little bit of headroom.
OK, here is my heating solution: Take one 1500 watt engine block heater in 110V (tube type from eBay USA) @ $19.95, one 12VDC centrifugal pump @ $16.98, one 12VDC thermostat with temp probe @ $9.95, a 12VDC dash switch @3.95, and one Kilovac SPNO contactor with a 12V pulldown coil @ $34.95. Total cost is under $100, and produces water at 180 deg F that is circulated through the car’s OEM heater core. Don’t mess with taking the dash apart and butchering your OEM ventilation system, and fiddling around with wimpy, useless ceramic heating cores that can melt your plastic and blow your fuses.
Have you thought of using a 12v DC input 2000watt peak AC output inverter which would be hard wired to the auxiliary 12v battery and you could wire a remote (Starter) relay to it so the car is nice and warm for when you are away from your 110v AC source?
Clever idea, Mike.
I don’t think the inverter would be necessary, he ought to be able to run it off of the pack voltage (if he isn’t already) since it’s just a resistive load.
Guess I misunderstood and thought the 110V was only applied while it was plugged in during charge.
Hi again everyone, go look at my heater. I’ve been running it for about three weeks, and there isn’t any noticeable difference between the original ICE heater and what I have put together. Can provide wiring diagram and parts list if anyone is interested…Cheers.
Mike, that looks fantastic! So you probably have a half gallon or so of anti-freeze cycling through all of that? How’d you get the bubbles out?
Let me know if you have any interest in writing an article on it for eveconvert.com (or send me the pics/info and I’ll write it).
Very clever.